
Dust Under PPF: Is It Normal or Does It Need Redoing?
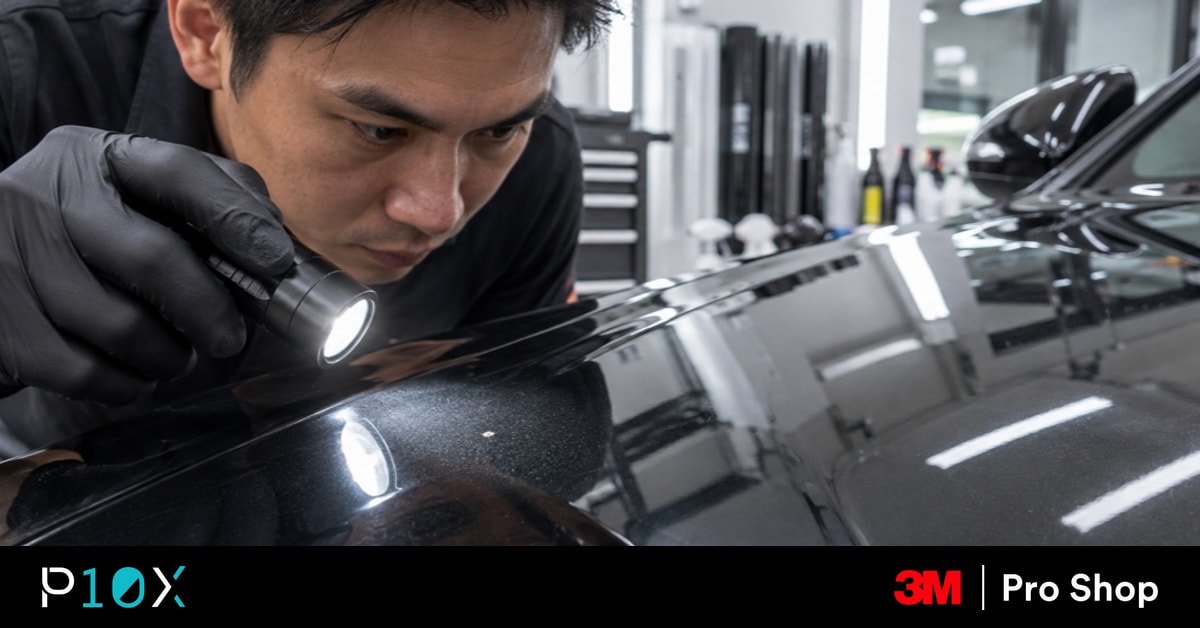
- Check the mark in soft daylight before using a strong inspection light.
- Give fresh film the settling time provided by the installer.
- Photograph the spot from normal viewing distance and close up.
- Return to the installer if the mark is raised, repeated, at an edge or causing lift.
Dust under PPF does not always mean the whole panel has to be redone. A single flat speck in the middle of a panel may be only cosmetic. A hard particle that raises the film or sits near an edge needs closer attention.
Fresh PPF is installed with liquid, so moisture can leave cloudiness or small pockets that change as the film settles. Solid debris stays in the same spot. The safe approach is to watch what changes, not to press on the film and guess.
Start with a calm inspection and take clear photos. If you also see poor trimming, lifted edges or visible stretch marks, this guide to a bad PPF installation will help you check the rest of the job.
Dust or Trapped Moisture?
PPF is normally fitted wet. The installer sprays application liquid on the paint and adhesive so the film can move into place. Most of that liquid is pushed out with a squeegee, but a fresh installation can still show pale patches, cloudiness or small rounded pockets.
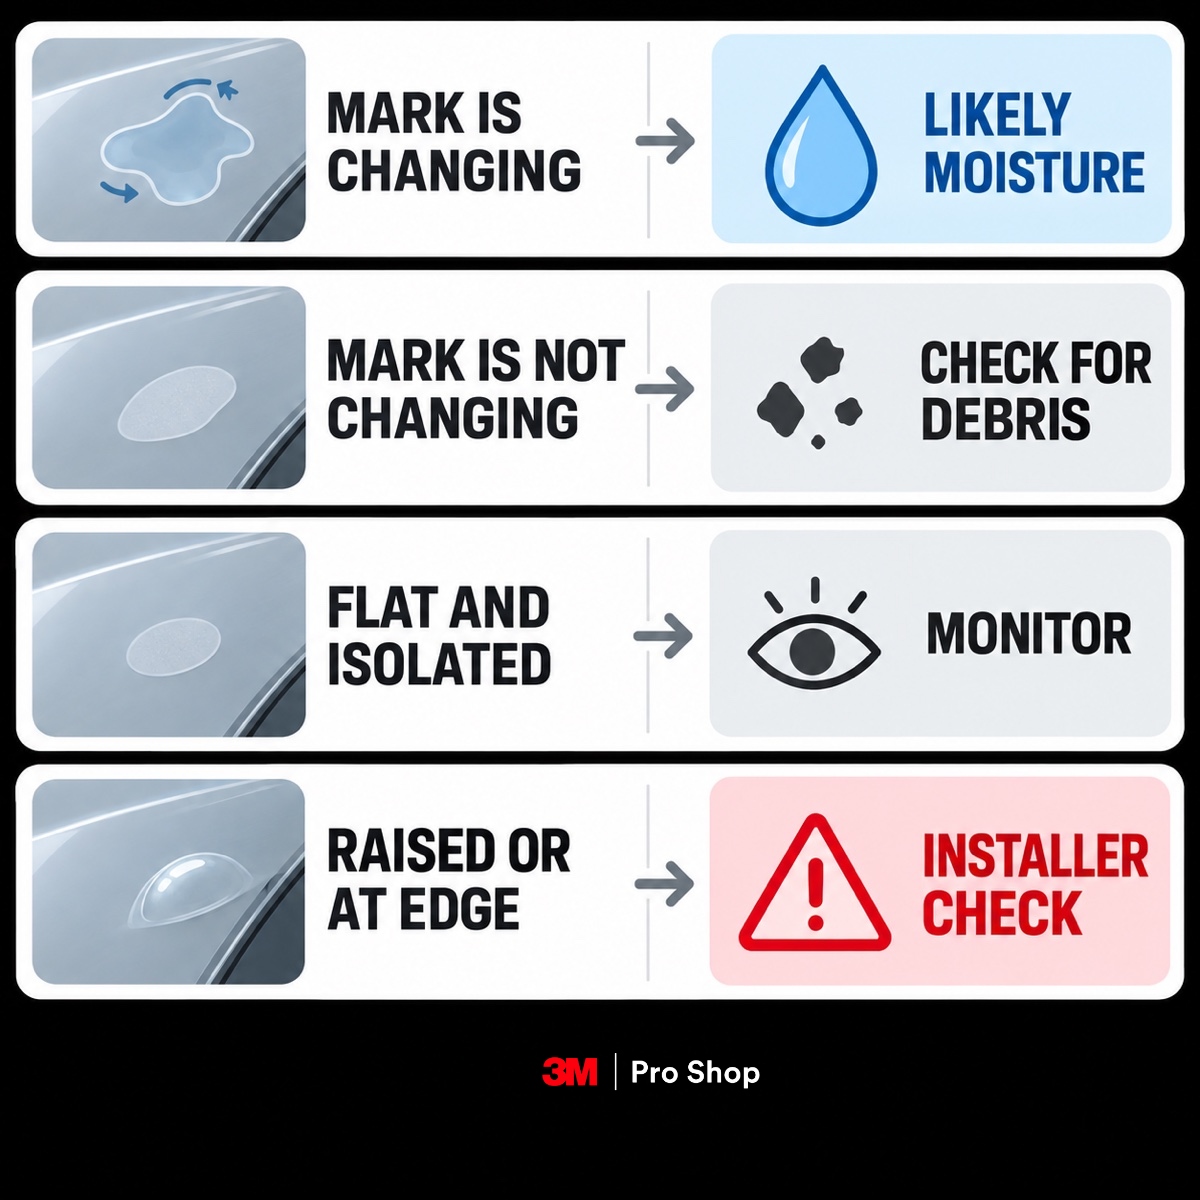
Moisture usually changes. A patch may become smaller, look lighter or shift in shape as the film settles. The timing is not identical for every car because the film, weather, panel shape and amount of liquid can differ. Follow the settling period given by the installer who did the job.
Dust looks more fixed. A grain has a clear centre that stays in the same place. If it is hard enough to hold the film up, a low light may reveal a tiny raised area or a shadow around it. A fibre may appear as a short line that does not shrink or move.
Do not decide from a close-up phone photo alone. A phone camera and strong LED can make a tiny mark look much larger than it appears beside the car. First look from normal standing distance in open shade. Move closer only after you have found the spot.
Not every bump is trapped dirt. A small paint nib, old touch-up mark or rough patch in the clear coat can remain visible through transparent film. Ask the installer to examine the panel and compare it with any inspection photos taken before the PPF was fitted.
Do not squeeze the mark to test it. Take one photo that shows where it sits on the panel, then a second close-up from the same angle. That gives the installer something useful to compare later without disturbing the adhesive.
Check Four Things
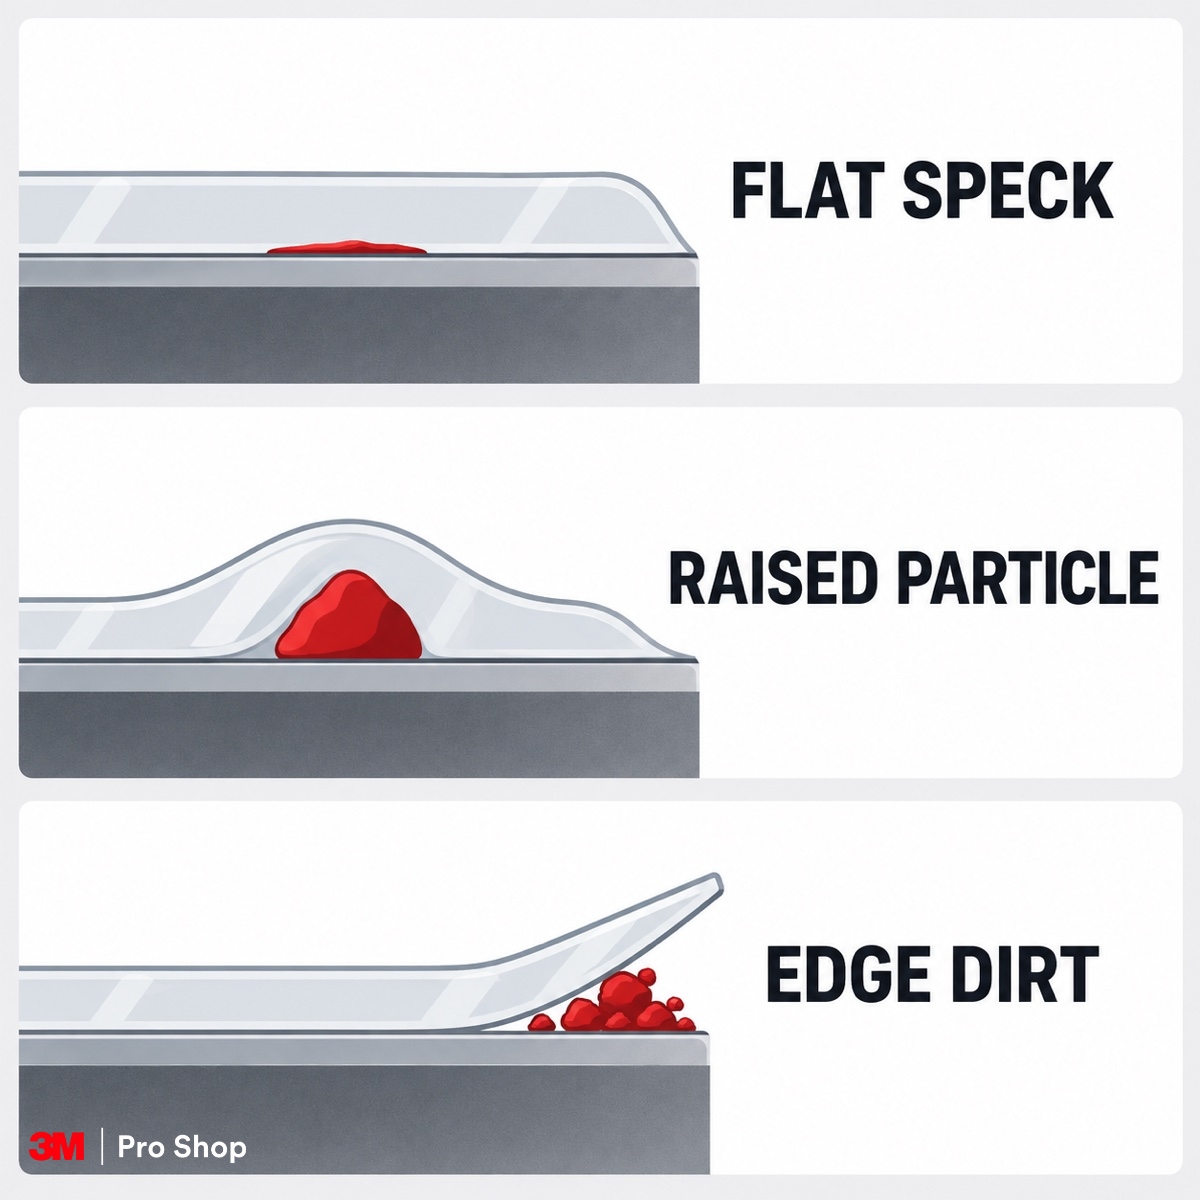
The graphic above separates the three shapes that matter most. A flat speck, a raised particle and dirt at an edge may look similar in a close-up, but they do not carry the same risk.
Start with height. A soft fibre lying flat may leave a visible line without creating a gap under the film. A hard grain can hold the PPF above the paint. That raised area matters more because the film is no longer sitting evenly on the panel.
Next, check the location. A tiny flat mark near the middle of a broad bonnet may remain a cosmetic issue. Dirt at a trimmed edge, wrapped corner or panel gap can interrupt contact where the film already has less room to hold. Look for a pale line, an opening at the edge or dirt starting to collect underneath.
Then look at the pattern. One isolated dot is different from several specks across the same panel. Repeated fibres, a cluster or a dirty line along an edge suggests a wider preparation or installation problem. Photograph each area rather than combining everything into one unclear complaint.
Finally, judge normal visibility. Stand beside the car as you would in a driveway or workshop handover. If you need to hold a light a few centimetres from the paint to find the mark, note that. If the mark catches your eye every time you walk up to the car, note that too.
These details give the installer a fair picture of the problem. They also make it easier to choose between waiting, correcting one small area or replacing the film on that panel.
Clean Preparation Matters
Dust under PPF usually gets trapped before the film is fully laid down. The paint needs to be washed, decontaminated and inspected. Seams, badges, trim and panel gaps need attention because dirt left there can be pulled onto a wet panel during installation.
The room matters too. A freshly cleaned bonnet can collect new dust if the floor, cloths, clothing or nearby work throws particles into the air. Good lighting also helps the installer spot a speck before the adhesive has settled around it.
One tiny speck does not prove that the whole job was careless. A clean workshop reduces contamination but cannot make the air completely empty. The stronger warning is a pattern across several areas, especially repeated fibres, dirty edges or marks that are easy to see at normal distance.
Ask how the panel was prepared and whether the shop photographed it before applying the film. If a bump follows the shape of a paint defect rather than a loose particle, those photos can stop both sides from blaming the wrong cause.
The photo below shows the kind of panel cleaning and preparation that should happen before the film is positioned. This stage is where loose grime, residue and old surface contamination should be removed.
When a Small Fix May Work
An installer may be able to correct one isolated particle without replacing all the film on that panel. This is more realistic when the PPF is still fresh, the spot is easy to reach and the film is not pulled tightly around a curve or corner.
A local correction still involves lifting part of the film. The installer needs enough access to remove the particle, keep new dirt away and lay the film down again without stretching it. The repaired area then has to look better than the original mark.
Location makes a big difference. A speck on a flatter part of the bonnet may be easier to reach than one deep in a bumper recess. Film wrapped around an edge or stretched over a complex curve is less forgiving. Lifting it can leave an adhesive line, a distorted patch or a new piece of contamination.
Ask the installer a simple question before agreeing: is the correction likely to be less visible than the spot is now? If the answer is uncertain and the speck is flat, isolated and hard to see, monitoring it may be the lower-risk choice.
If the particle is raised or affecting contact, leaving it may not be sensible. The installer can explain whether a careful local lift is enough or whether a fresh piece of film will give a cleaner result.
When Redoing the Panel Is Better
Redoing usually means replacing the film on the affected panel, not stripping PPF from the whole car. It becomes the stronger option when a particle forms a clear raised point, contamination appears in a cluster or dirt reaches an edge and the film starts lifting.
A visible fibre across the paint can also justify replacement, especially if it catches the eye at normal distance. The same applies when several marks appear across one panel. At that point, correcting each spot separately may leave more handling marks than fitting a clean piece once.
Edges deserve a faster response. Once an edge is open, dirt and water can work into the gap. Do not direct a pressure washer at it or keep pressing it down with your thumb. Photograph the area and let the installer inspect it before the opening grows.
Replacement may also be cleaner after an unsuccessful local repair. If the area now shows stretch, an adhesive line, cloudiness or a distorted surface, lifting it again may add another mark. A new panel piece gives the installer a clean start.
Keep the decision tied to what you can see and how the film is sitting. One flat dot that only appears under a close inspection light is not the same as a raised cluster that you notice every time you approach the car.
Ask the shop to name the exact panel, the reason for replacement and the result they expect. A clear plan is better than a vague promise that every mark will somehow disappear.
Give Fresh Film Time
A new PPF installation may not look completely settled on the day you collect the car. Small moisture pockets and light cloudiness can change as the remaining liquid leaves. Solid dust will not dissolve, but the wet mark around it may become easier to judge later.
Use the waiting period given by your installer. The right time to recheck depends on the film, application method, panel and weather. If the shop has booked an inspection date, keep it. Return sooner if an edge lifts, a raised area grows or the film opens around the particle.
While you wait, do not poke, squeeze, heat or massage the mark. Pressure on fresh adhesive can leave a print or move the liquid around it. Keep the first photos and take the next set from the same distance and angle.
Monitoring should have an end point. Agree on the recheck date and what change you are looking for. The decision graphic below keeps it simple: changing marks are more likely to involve moisture, while fixed debris needs to be judged by height, pattern and location.
Inspect It in Useful Light
Start in open shade or soft daylight from about one metre away. Walk past the panel from a few angles instead of staring straight at one point. This shows whether the mark affects the way the car normally looks.
Move closer after you know where it is. Hold a phone light low to the panel so the light travels across the surface. A raised particle may cast a small shadow or show a rim where the film is held above the paint. A flat speck usually has less shape around it.
Take both wide and close photos. Keep the panel edge, badge or body line in the wide frame so the installer can find the spot. For repeat photos, use roughly the same angle and distance. A changing camera angle can make the mark look larger or smaller even when nothing has changed.
You can compare the area with a similar part on the other side of the car, but do not expect both sides to look identical under an extreme light. Paint texture, panel curves and film tension can vary. The comparison is only there to help you spot a clear difference.
If the shop needs help finding the area, place a small piece of removable tape beside it, not on the fresh film. Do not stick tape across an edge or directly over the mark.
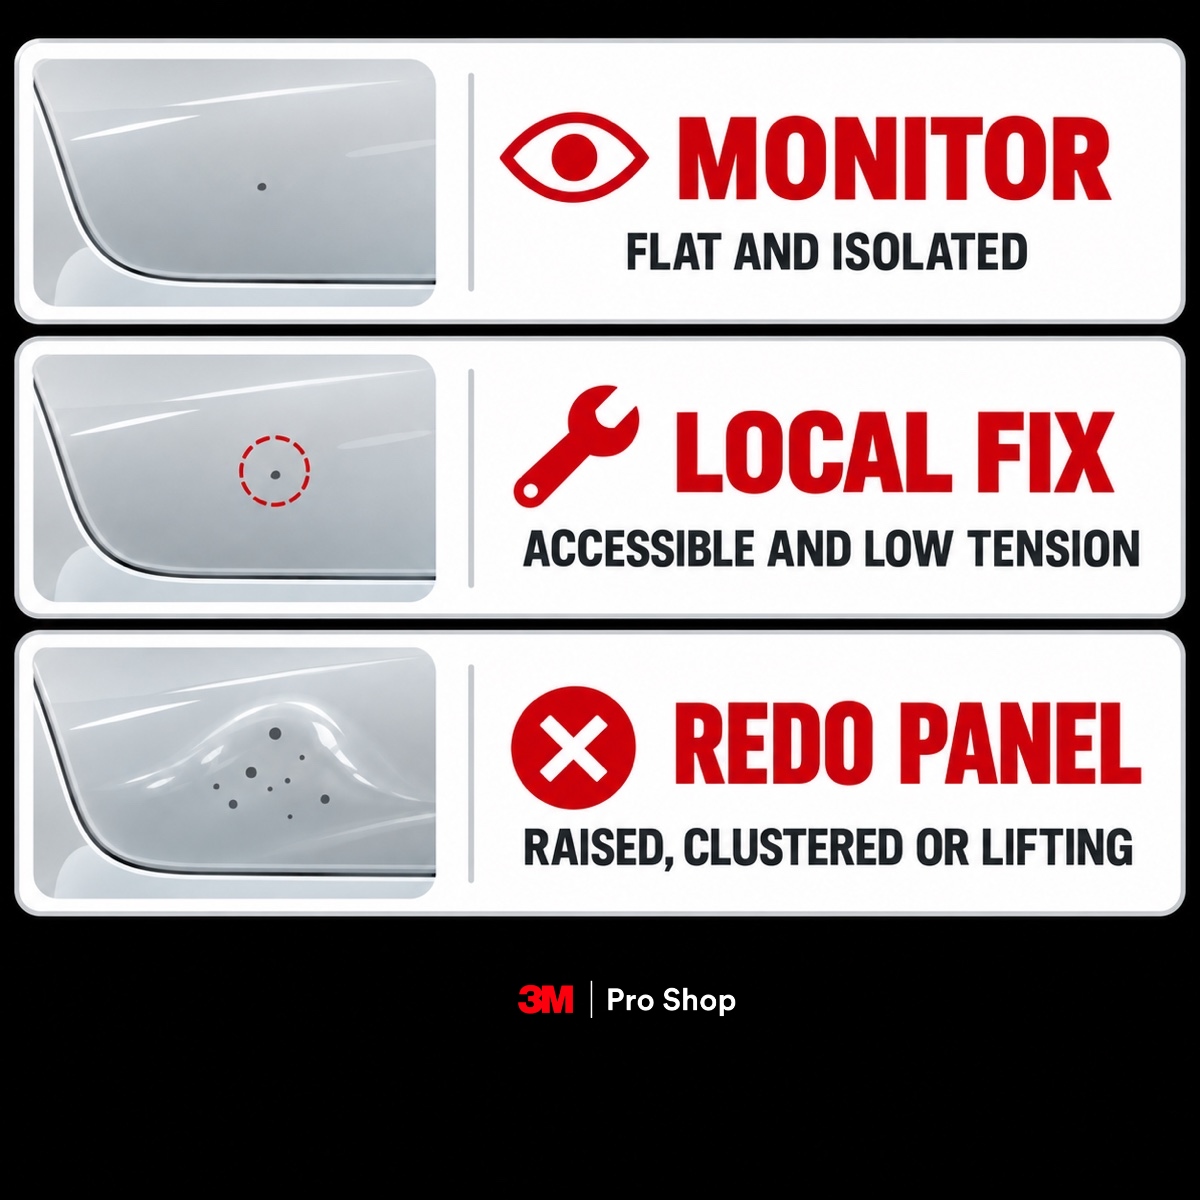
The outcome guide below brings the inspection back to the decision. Flat and isolated points can be monitored. Accessible, low-tension areas may suit a local fix. Raised, clustered or lifting areas need a stronger response.
Do Not Fix It Yourself
Do not use a pin, blade, fingernail or heat gun on the mark. A pin leaves a hole. A blade can cut the film or clear coat. A fingernail can crease fresh adhesive. Uncontrolled heat can distort the film and turn one small spot into a much larger repair.
Avoid trying to chase the particle toward an edge. The film is already attached around it, so pushing can stretch the surface or drag debris through the adhesive. It may also leave a visible line even if the speck moves.
Be careful with washing while the installation is fresh. Follow the shop's care instructions and keep strong water pressure away from any lifted edge. If an edge is already open, point it out before anyone cleans the car.
Tell the installer if the panel was repainted or repaired before the PPF was applied. Film lifted from non-original, weak or incompletely cured paint may create a separate risk. The shop needs that history before deciding how to correct the mark.
If you are worried that the technician will not find the spot, use your photos and place tape beside the area. Leave the film itself untouched until the inspection.
The photo below shows professional fitting with a squeegee. Corrections use the same need for controlled pressure, clean tools and a clean work area, which is why they should stay in the workshop.
Choose Monitor, Fix or Redo
Walk around the car with the installer in daylight. Show the wide photo first so they can find the location, then the close-up. Confirm whether the mark has changed since collection and whether the film is flat around it.
Agree on one next step. Monitor a flat, isolated speck that does not affect the edge or normal appearance. Consider a local correction when the particle is accessible and the installer expects the repaired area to look cleaner. Replace the panel piece when contamination is raised, clustered, lifting or still clearly visible after a failed correction.
Write down the panel and the agreed recheck or repair date. If the plan is to wait, ask what specific change should bring you back earlier. If the plan is a correction, ask whether the shop will stop and replace the piece if lifting it leaves a worse mark.
The aim is not to argue about whether any PPF job can be perfect under a magnifying light. You need a clear answer on whether this mark is only visible, or whether it is stopping the film from sitting and holding properly.
A 3M Pro Shop by P10X location can inspect the panel and explain the available options before any correction starts. Do not leave the handover until both you and the installer agree on the exact panel, the next action and when it will happen.
Find out the best protection for your car
Visit a 3M Pro Shop and discover the cost-effective 3M Protective Film and Window Tint

Frequently Asked Questions
Is one speck of dust under PPF normal?
One tiny, flat and isolated speck may be a cosmetic issue rather than a reason to redo the panel. It still needs a proper look if it is raised, obvious from normal distance or close to an edge.
How can I tell dust from moisture?
Moisture often changes shape, size or appearance while fresh film settles. Solid debris keeps a fixed centre. Check it in soft daylight, then use a low side light to see whether the film is raised.
Will dust under PPF disappear?
No. Solid dust does not evaporate. The liquid or cloudiness around it may change, which can make the area easier to judge after the settling period.
Can dust under PPF cause lifting?
A hard particle can hold the film above the paint. Dirt at an edge can also interrupt contact and give the edge somewhere to start lifting. Both deserve an installer check.
Can an installer remove one dust speck?
Sometimes. A local correction may work when the spot is easy to reach, the film is fresh and the area is not under much tension. The installer should first decide whether lifting the film is likely to leave a cleaner result.
Should the whole PPF panel be redone?
Consider replacing the affected panel piece when contamination is raised, clustered, along an edge, causing lift or still distorted after a local correction. One flat speck that is difficult to see may be better monitored.
How long should I wait before deciding?
Use the settling period provided by the installer, then compare the area with your first photos. Return sooner if the mark grows, an edge opens or the film starts lifting.
Author

Kelvin Cheen
Kelvin is an Automotive Solutions Consultant and Branch Manager at 3M Pro Shop. With 4+ years of field experience in premium vehicle surface protection, Kelvin specializes in flagship 3M technologies, including 3M Crystalline Black optical film and Ceramic IR tints, 3M Paint Protection Film (PPF), etc. His focus is on delivering transparent, engineering-backed advice to car and EV owners, cutting through sales upsells to ensure customers choose the exact thermal rejection and paint protection tailored to their driving needs.
Experience the future of window tinting
Visit a 3M Pro Shop and discover the revolutionary Crystalline CR BLK film