
Car Window Tint Bubbles: Why They Happen and How Pros Prevent Them

You have invested in car window tint installation to reduce heat, block UV rays and improve cabin comfort, but within weeks or months you notice car tint bubbles forming along the edges, tiny dust specks trapped under the film or corners starting to peel away. These problems are frustrating, unsightly and can compromise the performance of your tint. Understanding why they happen and how professional installers prevent them will help you make better decisions and avoid costly re-work.
What Causes Car Tint Bubbles
Car tint bubbles appear when the adhesive layer fails to bond completely to the glass surface. This creates small pockets of air or moisture that show as round or irregular bulges in the film.
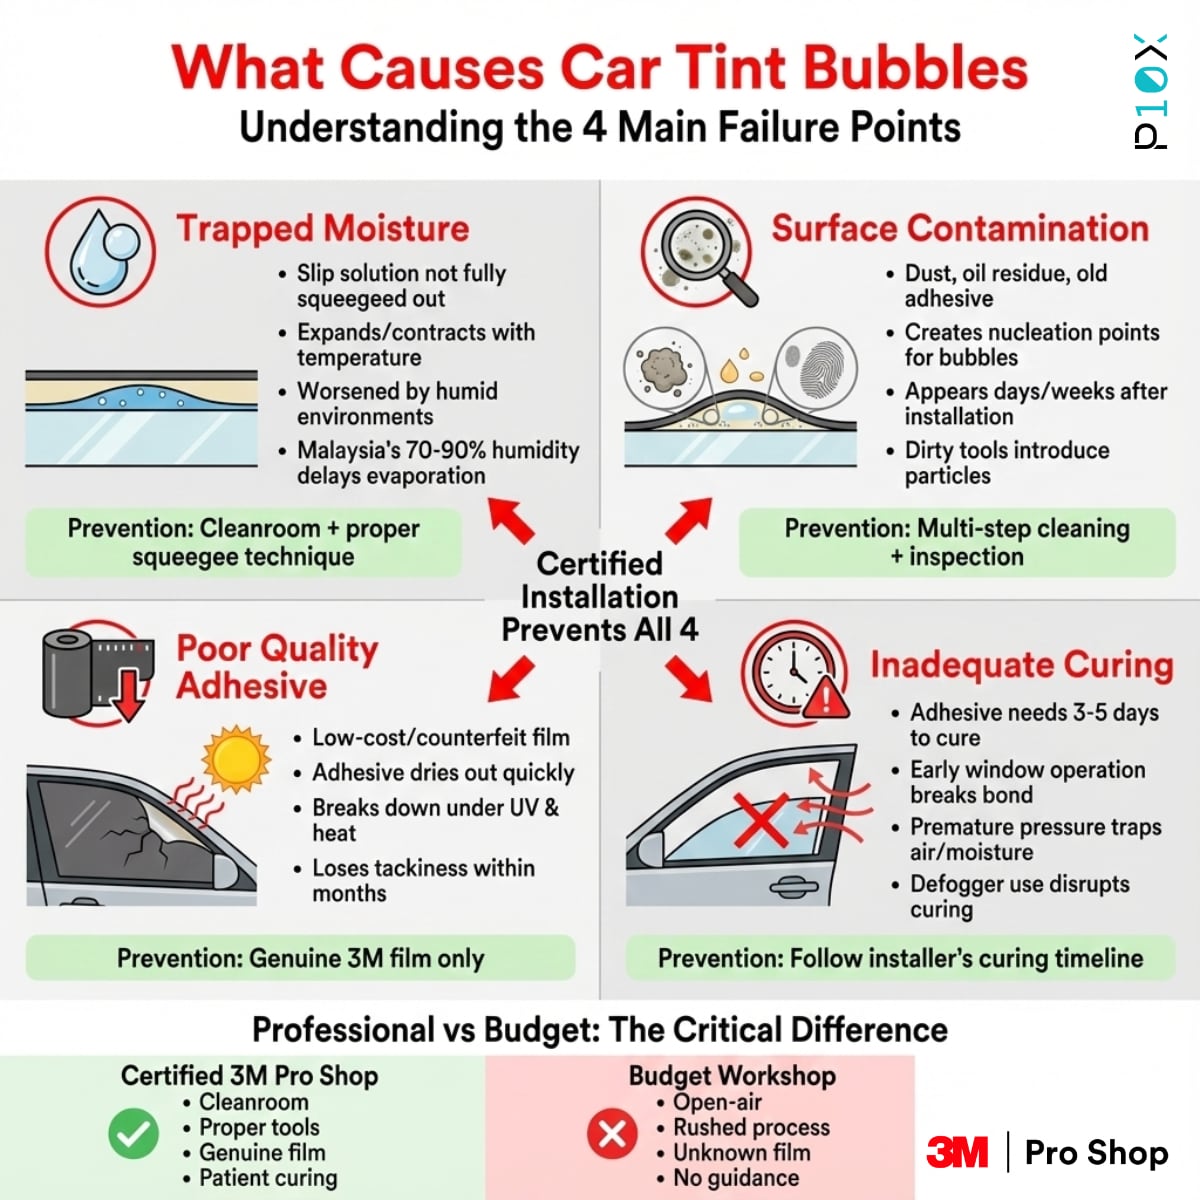
Trapped moisture during installation
Window tint is applied using a slip solution, a mixture of water and a small amount of soap or detergent. This solution allows the installer to position the film before squeezing out the liquid and letting the adhesive cure. If the installer does not remove enough moisture with the squeegee, pockets of water remain trapped. Over time, these pockets expand and contract with temperature changes, forming visible bubbles.
In Malaysia's hot and humid climate, excess moisture under the film can take longer to evaporate, especially if the tint is applied in an open workshop where humidity levels are high. Professional installers control this by working in air-conditioned cleanroom environments and using lint-free tools to extract every drop of slip solution.
Contamination on the glass surface
Even microscopic dust, oil residue, fingerprints or old adhesive remnants on the glass will prevent the tint adhesive from making full contact. Contaminated spots act as nucleation points where bubbles form days or weeks after installation, once the film has had time to contract slightly during the curing process.
Workshops that skip thorough pre-cleaning or use dirty tools and cloths introduce contaminants that show up as clusters of small bubbles or hazy patches. Certified 3M Pro Shops clean glass surfaces multiple times using lint-free microfiber cloths and professional-grade cleaners, then inspect under bright light before applying film.
Poor quality adhesive or old film
Low cost or counterfeit tint film often uses adhesive formulations that dry out quickly, lose tackiness or react poorly to heat and UV exposure. These films may bond initially but start to lift and bubble within months as the adhesive breaks down.
Genuine 3M films are engineered with stable adhesives that maintain bond strength over years, even under intense Malaysian sun. When you choose a JPJ compliant window tint from a certified installer, you get film that has been tested for long term adhesion and comes with a warranty that covers defects including bubbling.
Inadequate curing time or premature window operation
Window tint adhesive needs time to cure fully. During the first few days after installation, the bond is still developing. If you lower the windows, use the defogger or apply pressure to the film too soon, you risk breaking the adhesive bond and trapping air or moisture that leads to bubbles.
Professional installers advise customers to avoid rolling down windows for at least three to five days and to keep the car in a shaded or covered area where possible during this period. Rushing this process is a common cause of early bubble formation.
Why Dust Specks Appear Under Window Tint
Dust specks are tiny particles trapped between the glass and the tint film. They show as small dark dots or white spots depending on the lighting and are permanent once the adhesive has cured.
Non-cleanroom installation environment
Most dust contamination happens because the workshop is not a controlled cleanroom. Open bay workshops, roadside installers and home garages are exposed to airborne dust, pollen, insects and other particles that settle on the wet film during application.
3M Pro Shops install tint in enclosed, air-conditioned rooms with filtered air to minimize airborne contamination. The difference in final quality between a cleanroom installation and an open-air installation is immediately visible.
Dirty tools, towels or hands
Installers who reuse dirty squeegees, towels or spray bottles introduce particles directly onto the glass or film. Even a single cloth that has been dropped on the floor can carry dozens of dust particles that end up trapped under the tint.
Certified installers use fresh, lint-free microfiber cloths for each job, dedicated squeegees that are cleaned and stored properly, and fresh slip solution mixed in clean containers. These practices are standard at authorized 3M outlets but often skipped by budget installers.
Skipping pre-cleaning or rushing the process
Thorough surface preparation is the foundation of a dust-free installation. This includes removing old tint or adhesive residue, scrubbing the glass with a blade or scraper to lift embedded grime, then wiping down multiple times with lint-free cloths and inspecting under bright light.
Installers who rush this step or skip the inspection stage are almost certain to trap dust under the film. Professional installation takes time because every surface must be validated as clean before the film is applied.
What Causes Tint Film to Peel at the Edges
Peeling edges occur when the tint film loses adhesion at the perimeter of the window, usually starting at the bottom or top edge and spreading over time.
Incomplete edge sealing or exposed cut lines
If the installer does not tuck the film deep enough into the window channel or leaves visible cut lines at the edge, moisture and dirt can enter from the side. This gradually weakens the adhesive and causes the film to lift.
Professional installers remove the door panel before tinting so the film can be inserted fully into the glass channel, creating a seamless edge with no exposed cuts. This technique is standard at 3M Pro Shops but often skipped by workshops trying to save time or labor cost.
Water exposure before full curing
In Malaysia, sudden rain or car washes during the first few days after tinting can introduce water along the edges before the adhesive has cured. This moisture gets trapped at the perimeter and weakens the bond, leading to lifting and peeling.
Installers should advise customers to avoid washing the car or driving in heavy rain for at least three to five days after installation. Following this guidance is critical for edge durability.
Poor adhesive coverage at the perimeter
If the installer trims the film too aggressively or fails to apply even pressure at the edges during squeegeeing, the adhesive layer at the perimeter may be incomplete. These weak spots become entry points for moisture and peeling.
Certified installers use consistent, controlled strokes with the squeegee from the center outward to ensure full adhesive contact across the entire film, including edges and corners.
Film shrinkage due to heat or UV exposure
Low quality tint films can shrink slightly when exposed to heat and UV rays over months or years. This shrinkage pulls the film away from the edges and creates gaps where peeling starts.
3M window films are engineered with dimensional stability, meaning they resist shrinkage even under intense sun and high cabin temperatures. When you invest in a 3M window tint price package from a certified shop, you are paying for this long term stability and edge retention.
How Professional Installers Prevent These Problems
The difference between a flawless tint that lasts for years and a defective installation full of bubbles, dust and peeling edges comes down to environment, technique and product quality.
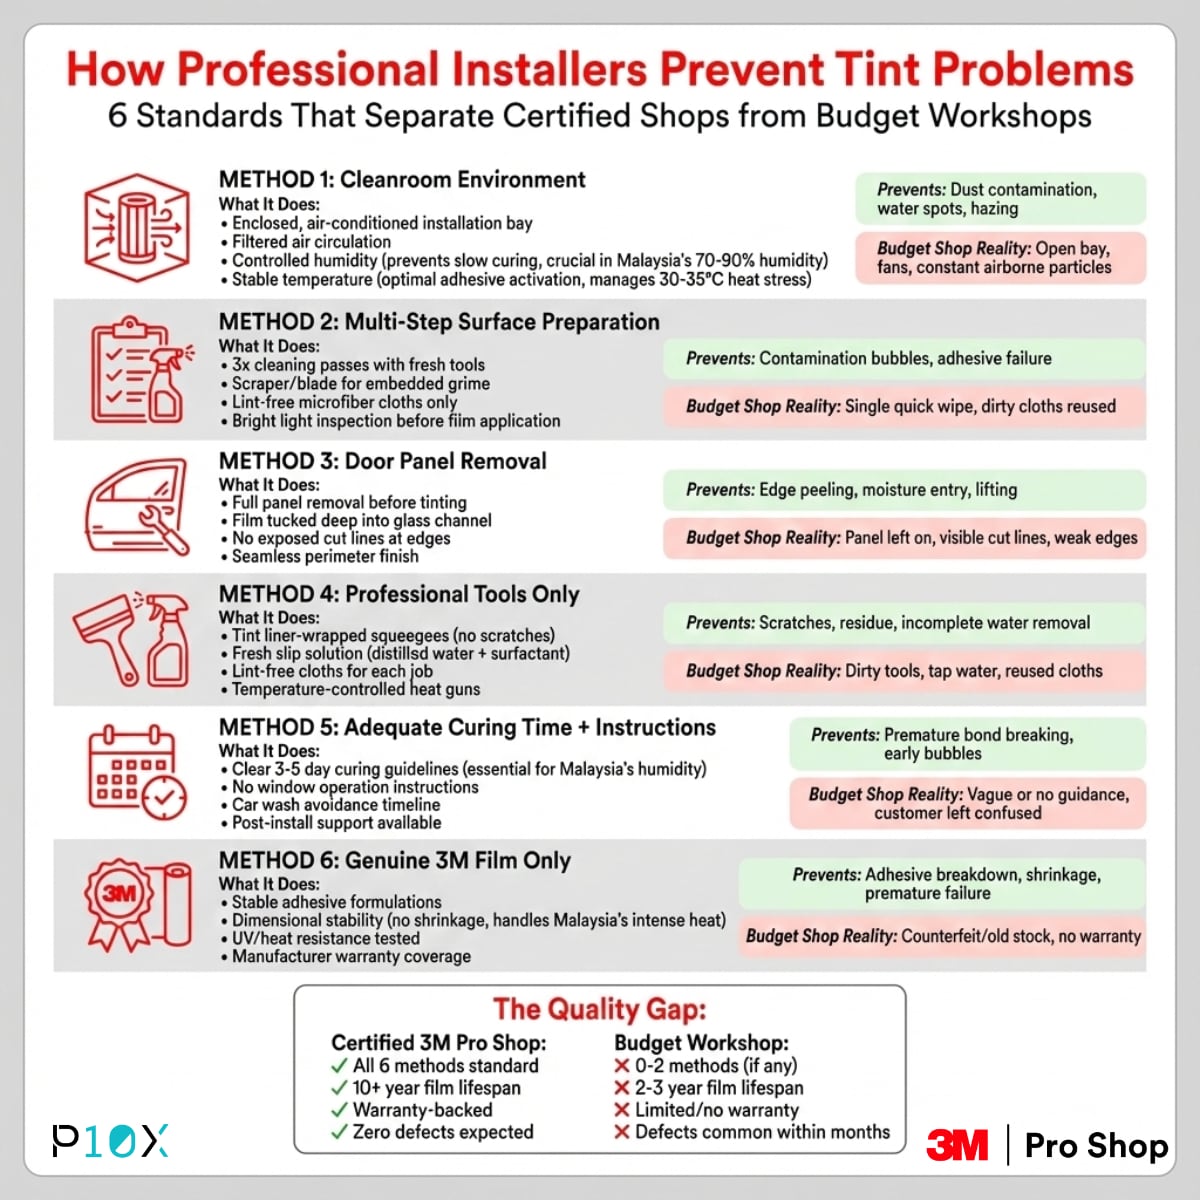
Cleanroom environment with controlled air and temperature
Certified 3M Pro Shops operate in enclosed, air-conditioned rooms with filtered air circulation. This minimizes airborne dust, controls humidity and maintains a stable temperature that allows the adhesive to cure evenly.
Workshops that install tint in open bays or under fans are exposing the film to constant contamination. The cost of maintaining a cleanroom is part of the service fee at professional outlets, and the quality difference is worth the investment.
Proper surface preparation and multi-step cleaning
Professional installers clean the glass at least three times before applying film. The first pass removes loose dirt and grime. The second pass uses a scraper or blade to lift embedded particles and old adhesive. The third pass is a final wipe with a fresh lint-free cloth and inspection under bright light.
Each cleaning step uses fresh tools and fresh slip solution. This ensures that contaminants removed in earlier steps are not reintroduced during final preparation.
Door panel removal for seamless edge finishing
Removing the door panel allows the installer to lower the window slightly and tuck the film deep into the glass channel. This eliminates exposed cut lines at the edge, improves film coverage and reduces the risk of peeling.
While this step adds labor time, it is standard practice at 3M Pro Shops because it directly impacts long term durability and customer satisfaction.
Using lint-free tools and fresh slip solution
Every microfiber cloth, squeegee and spray bottle used by certified installers is either new or cleaned and stored in a dust-free environment. Slip solution is mixed fresh for each job using distilled water and a precise ratio of surfactant to ensure optimal slip and adhesion without leaving residue.
Budget installers often reuse towels, refill spray bottles without cleaning them and use tap water with high mineral content. These shortcuts introduce contamination and compromise the final result.
Adequate curing time and post-installation instructions
After installation, professional shops provide clear instructions on curing time, window operation and car washing. They explain why these guidelines matter and what risks come from ignoring them.
Customers who follow these instructions almost never experience early defects. Those who rush the process or skip the advice often return with complaints about bubbles or peeling that could have been avoided.
Genuine 3M film with stable adhesive formulations
All of the preparation and technique in the world will not save a low quality film with weak adhesive. Certified 3M Pro Shops install only genuine 3M window films that have been tested for adhesion, dimensional stability, UV resistance and long term performance in tropical climates.
When you choose a 3M crystalline tint comparison from an authorized dealer, you are guaranteed to receive film that meets these standards and comes with a warranty that covers defects including bubbling and peeling.
How to Choose an Installer Who Delivers Defect-Free Tint
If you want to avoid the frustration and cost of re-tinting your car, focus on these factors when selecting an installer.
Look for certified 3M Pro Shop status
3M Pro Shops are authorized dealers who have met strict standards for facility quality, technician training and customer service. These shops have access to genuine 3M products and are required to follow 3M's installation protocols.
You can verify 3M Pro Shop status by checking the official 3M website or looking for certification plaques and branding at the outlet. Do not rely on generic claims like "3M dealer" without verification.
Verify cleanroom installation facilities
Ask whether the shop installs tint in a controlled cleanroom environment. If the answer is no or vague, expect dust contamination and other quality issues.
Cleanroom installation is a baseline requirement for professional work. Shops that invest in proper facilities demonstrate commitment to quality and are more likely to deliver defect-free results.
Check for door panel removal as standard practice
Confirm that the shop removes door panels before tinting. This is a clear indicator that the installer prioritizes edge quality and long term durability over speed and convenience.
Shops that skip this step are cutting corners, and you will see the consequences within months when edges start to lift.
Review warranty terms and coverage
A comprehensive warranty should cover bubbling, peeling, discoloration and adhesive failure for at least three to five years. Read the fine print to understand what is excluded and what conditions you must meet to keep the warranty valid.
Shops that offer strong warranties are confident in their work and their products. Budget installers often provide limited or no warranty because they know defects are likely.
Compare genuine 3M pricing and avoid extremely low quotes
If a quote for 3M tint is significantly lower than the average market price from certified dealers, the film is likely counterfeit or old stock. Genuine 3M film has a cost floor based on manufacturing, distribution and dealer margins.
Paying a fair price for certified installation and genuine film is the only way to ensure you get the performance, durability and warranty protection that 3M products are known for. Trying to save money on tint almost always results in higher costs later when you need to redo the job.
What to Do If Your Tint Already Has Bubbles, Dust or Peeling
If you are experiencing tint defects, your options depend on when the problem appeared and whether you have a valid warranty.
Small bubbles that appeared within the first week
Tiny bubbles that form during the first few days after installation may disappear as the adhesive continues to cure and moisture evaporates. Wait at least one week before concluding that the bubbles are permanent.
If the bubbles do not resolve after seven days, contact the installer to request an inspection and possible re-work under warranty.
Dust specks or larger bubbles present from the start
These defects indicate poor installation quality and should be addressed immediately. Document the issues with photos and contact the installer within the first 48 hours to request a re-installation.
Reputable shops will acknowledge the problem and schedule a re-do at no cost. Shops that refuse to fix obvious defects should be avoided for future work.
Peeling edges that started after several months
If peeling begins after the warranty period or if the warranty excludes peeling due to customer actions like early window operation or car washing, you may need to pay for re-work.
In some cases, a skilled installer can lift the affected section, re-clean the glass and re-apply the film. If the peeling is extensive or the adhesive has failed across the entire panel, a full replacement is necessary.
Deciding whether to repair or replace
Minor edge peeling or a few small bubbles can sometimes be repaired by lifting and re-sealing the affected area. Widespread bubbling, heavy dust contamination or severe peeling requires complete removal and re-installation.
Consult a certified 3M Pro Shop for an honest assessment. Professional installers will recommend the most cost-effective solution based on the extent of the defects and the condition of the film.
Why 3M Pro Shops Deliver Long-Term Tint Quality
Choosing a certified 3M Pro Shop is the most reliable way to avoid car tint bubbles, dust specks and peeling edges. These outlets combine controlled environments, trained technicians, genuine products and comprehensive warranties to ensure your tint looks and performs as expected for years.
If you are ready to invest in professional window tinting that delivers lasting comfort, UV protection and heat rejection without defects, visit a 3M Pro Shop location to discuss your needs and confirm that your installation will meet the highest standards. Proper preparation, professional technique and genuine 3M film are the only way to guarantee a flawless result.
Find out the best protection for your car
Visit a 3M Pro Shop and discover the cost-effective 3M Protective Film and Window Tint
Frequently Asked Questions
Why do car tint bubbles appear months after installation?
Bubbles that appear months later usually result from trapped moisture or contaminants that were present during installation but only became visible as the adhesive aged and contracted. Poor quality adhesive can also lose bond strength over time, creating bubbles where the film lifts from the glass. Genuine 3M films installed in cleanroom environments rarely develop late-stage bubbles.
Can I fix tint bubbles myself at home?
Small bubbles near the edge can sometimes be smoothed out by carefully lifting the film, re-cleaning the glass and re-applying with a squeegee. However, this requires skill and the right tools. Attempting DIY repairs on larger bubbles or bubbles in the center of the window often makes the problem worse. Professional removal and re-installation is safer and more reliable.
How long should I wait before rolling down my windows after tinting?
Most professional installers recommend waiting at least three to five days before lowering the windows. This allows the adhesive to cure fully and prevents the film from shifting or lifting at the edges. In humid conditions or during rainy weather, waiting up to seven days is safer.
Do all tint shops remove door panels before installation?
No, many budget installers skip door panel removal to save time and labor cost. This results in visible cut lines at the window edge and increases the risk of peeling. Certified 3M Pro Shops remove door panels as standard practice to ensure seamless edge finishing and long term durability.
Is dust under the tint covered by warranty?
Dust contamination caused by poor installation is typically covered under warranty if reported within the first few days or weeks. However, warranties usually require that you return to the original installer for inspection and re-work. Always document defects with photos and contact the shop as soon as you notice the problem to preserve your warranty rights.

Fabian
He is passionate about revolutionizing the car protection services industry by bringing innovation and transparency to a traditionally opaque and often misunderstood field. His mission is to educate end users on the true benefits and importance of car protection, aiming to replace outdated practices with honest, customer-focused solutions. With a fresh approach to car tinting, paint protection film (PPF), and detailing services, he is committed to delivering a superior customer experience that sets a new standard in the market. He welcomes discussions about the future of the automotive industry and is eager to connect with like-minded professionals who share his vision for innovation, integrity, and excellence.

Experience the future of window tinting
Visit a 3M Pro Shop and discover the revolutionary Crystalline CR BLK film